RocketMQ笔记(一)—— QuickStart
程序启动
环境配置
官网 http://rocketmq.apache.org/ ,以下内容基于 4.9.0 版本
直接下载 bin-release
1 | # 解压并进入文件夹 |
启动 RocketMQ 地址
1 | # 启动 名字服务 Name Server |
控制台安装
本地直接启动
下载地址,修改配置文件
/src/main/resources/application.properties1
2
3
4# 启动端口号
=7000
# nameServer 地址
=localhost:9876添加依赖,JAXB 依赖 (Java Architechture for Xml Binding)
1
2
3
4
5
6
7
8
9
10
11
12
13
14
15
16
17
18
19
20<dependency>
<groupId>javax.xml.bind</groupId>
<artifactId>jaxb-api</artifactId>
<version>2.3.0</version>
</dependency>
<dependency>
<groupId>com.sun.xml.bind</groupId>
<artifactId>jaxb-impl</artifactId>
<version>2.3.0</version>
</dependency>
<dependency>
<groupId>com.sun.xml.bind</groupId>
<artifactId>jaxb-core</artifactId>
<version>2.3.0</version>
</dependency>
<dependency>
<groupId>javax.activation</groupId>
<artifactId>activation</artifactId>
<version>1.1.1</version>
</dependency>打包
1
mvn clean package -Dmaven.test.skip=true
启动
1
java -jar rocketmq-console-ng-1.0.0.jar
源码启动
从 github 拉取源码
git clone https://github.com/apache/rocketmq.git
在 Idea 中导入项目
在根目录
.../rocketmq创建配置文件文件夹conf,将.../rocketmq/distribution/conf/下的配置文件broker.conf, logback_namesrv.xml, logback_broker.xml拷贝到自建的.../rocketmq/conf/目录下按需修改
broker.conf配置文件1
2
3
4
5
6
7
8
9
10
11
12
13
14
15
16
17
18
19
20
21
22
23
24
25
26
27
28
29
30
31
32
33
34
35
36
37
38
39
40
41
42
43
44
45
46
47
48
49
50
51
52
53
54
55
56
57
58
59
60
61
62
63
64
65
66
67
68
69
70
71
72
73
74
75
76
77
78
79
80
81
82
83
84
85
86
87
88
89
90
91
92
93
94
95
96# Licensed to the Apache Software Foundation (ASF) under one or more
# contributor license agreements. See the NOTICE file distributed with
# this work for additional information regarding copyright ownership.
# The ASF licenses this file to You under the Apache License, Version 2.0
# (the "License"); you may not use this file except in compliance with
# the License. You may obtain a copy of the License at
#
# http://www.apache.org/licenses/LICENSE-2.0
#
# Unless required by applicable law or agreed to in writing, software
# distributed under the License is distributed on an "AS IS" BASIS,
# WITHOUT WARRANTIES OR CONDITIONS OF ANY KIND, either express or implied.
# See the License for the specific language governing permissions and
# limitations under the License.
# 所属集群名字
brokerClusterName=DefaultCluster
# broker 名字,注意此处不同的配置文件填写的不一样,如果在 broker-a.properties 使用: broker-a,
# 在 broker-b.properties 使用: broker-b
brokerName=broker-a
# 0 表示 Master,> 0 表示 Slave
brokerId=0
# nameServer地址,分号分割
# namesrvAddr=rocketmq-nameserver1:9876;rocketmq-nameserver2:9876
# 启动IP,如果 docker 报 com.alibaba.rocketmq.remoting.exception.RemotingConnectException: connect to <192.168.0.120:10909> failed
# 解决方式1 加上一句 producer.setVipChannelEnabled(false);,解决方式2 brokerIP1 设置宿主机IP,不要使用docker 内部IP
brokerIP1=192.168.200.129
# 在发送消息时,自动创建服务器不存在的topic,默认创建的队列数
defaultTopicQueueNums=4
# 是否允许 Broker 自动创建 Topic,建议线下开启,线上关闭
autoCreateTopicEnable=true
# 是否允许 Broker 自动创建订阅组,建议线下开启,线上关闭
autoCreateSubscriptionGroup=true
# Broker 对外服务的监听端口
listenPort=10911
# 删除文件时间点,默认凌晨4点
deleteWhen=04
# 文件保留时间,默认48小时
fileReservedTime=120
# commitLog 每个文件的大小默认1G
mapedFileSizeCommitLog=1073741824
# ConsumeQueue 每个文件默认存 30W 条,根据业务情况调整
mapedFileSizeConsumeQueue=300000
# destroyMapedFileIntervalForcibly=120000
# redeleteHangedFileInterval=120000
# 检测物理文件磁盘空间
diskMaxUsedSpaceRatio=88
# 存储路径
# storePathRootDir=/home/ztztdata/rocketmq-all-4.1.0-incubating/store
# commitLog 存储路径
# storePathCommitLog=/home/ztztdata/rocketmq-all-4.1.0-incubating/store/commitlog
# 消费队列存储
# storePathConsumeQueue=/home/ztztdata/rocketmq-all-4.1.0-incubating/store/consumequeue
# 消息索引存储路径
# storePathIndex=/home/ztztdata/rocketmq-all-4.1.0-incubating/store/index
# checkpoint 文件存储路径
# storeCheckpoint=/home/ztztdata/rocketmq-all-4.1.0-incubating/store/checkpoint
# abort 文件存储路径
# abortFile=/home/ztztdata/rocketmq-all-4.1.0-incubating/store/abort
# 限制的消息大小
maxMessageSize=65536
# flushCommitLogLeastPages=4
# flushConsumeQueueLeastPages=2
# flushCommitLogThoroughInterval=10000
# flushConsumeQueueThoroughInterval=60000
# Broker 的角色
# - ASYNC_MASTER 异步复制Master
# - SYNC_MASTER 同步双写Master
# - SLAVE
brokerRole=ASYNC_MASTER
# 刷盘方式
# - ASYNC_FLUSH 异步刷盘
# - SYNC_FLUSH 同步刷盘
flushDiskType=ASYNC_FLUSH
# 发消息线程池数量
# sendMessageThreadPoolNums=128
# 拉消息线程池数量
# pullMessageThreadPoolNums=128启动 nameServer
org.apache.rocketmq.namesrv.NamesrvStartup#main配置其环境变量
ROCKETMQ_HOME=/Users/qiuhan/Desktop/rocketmq/source/rocketmq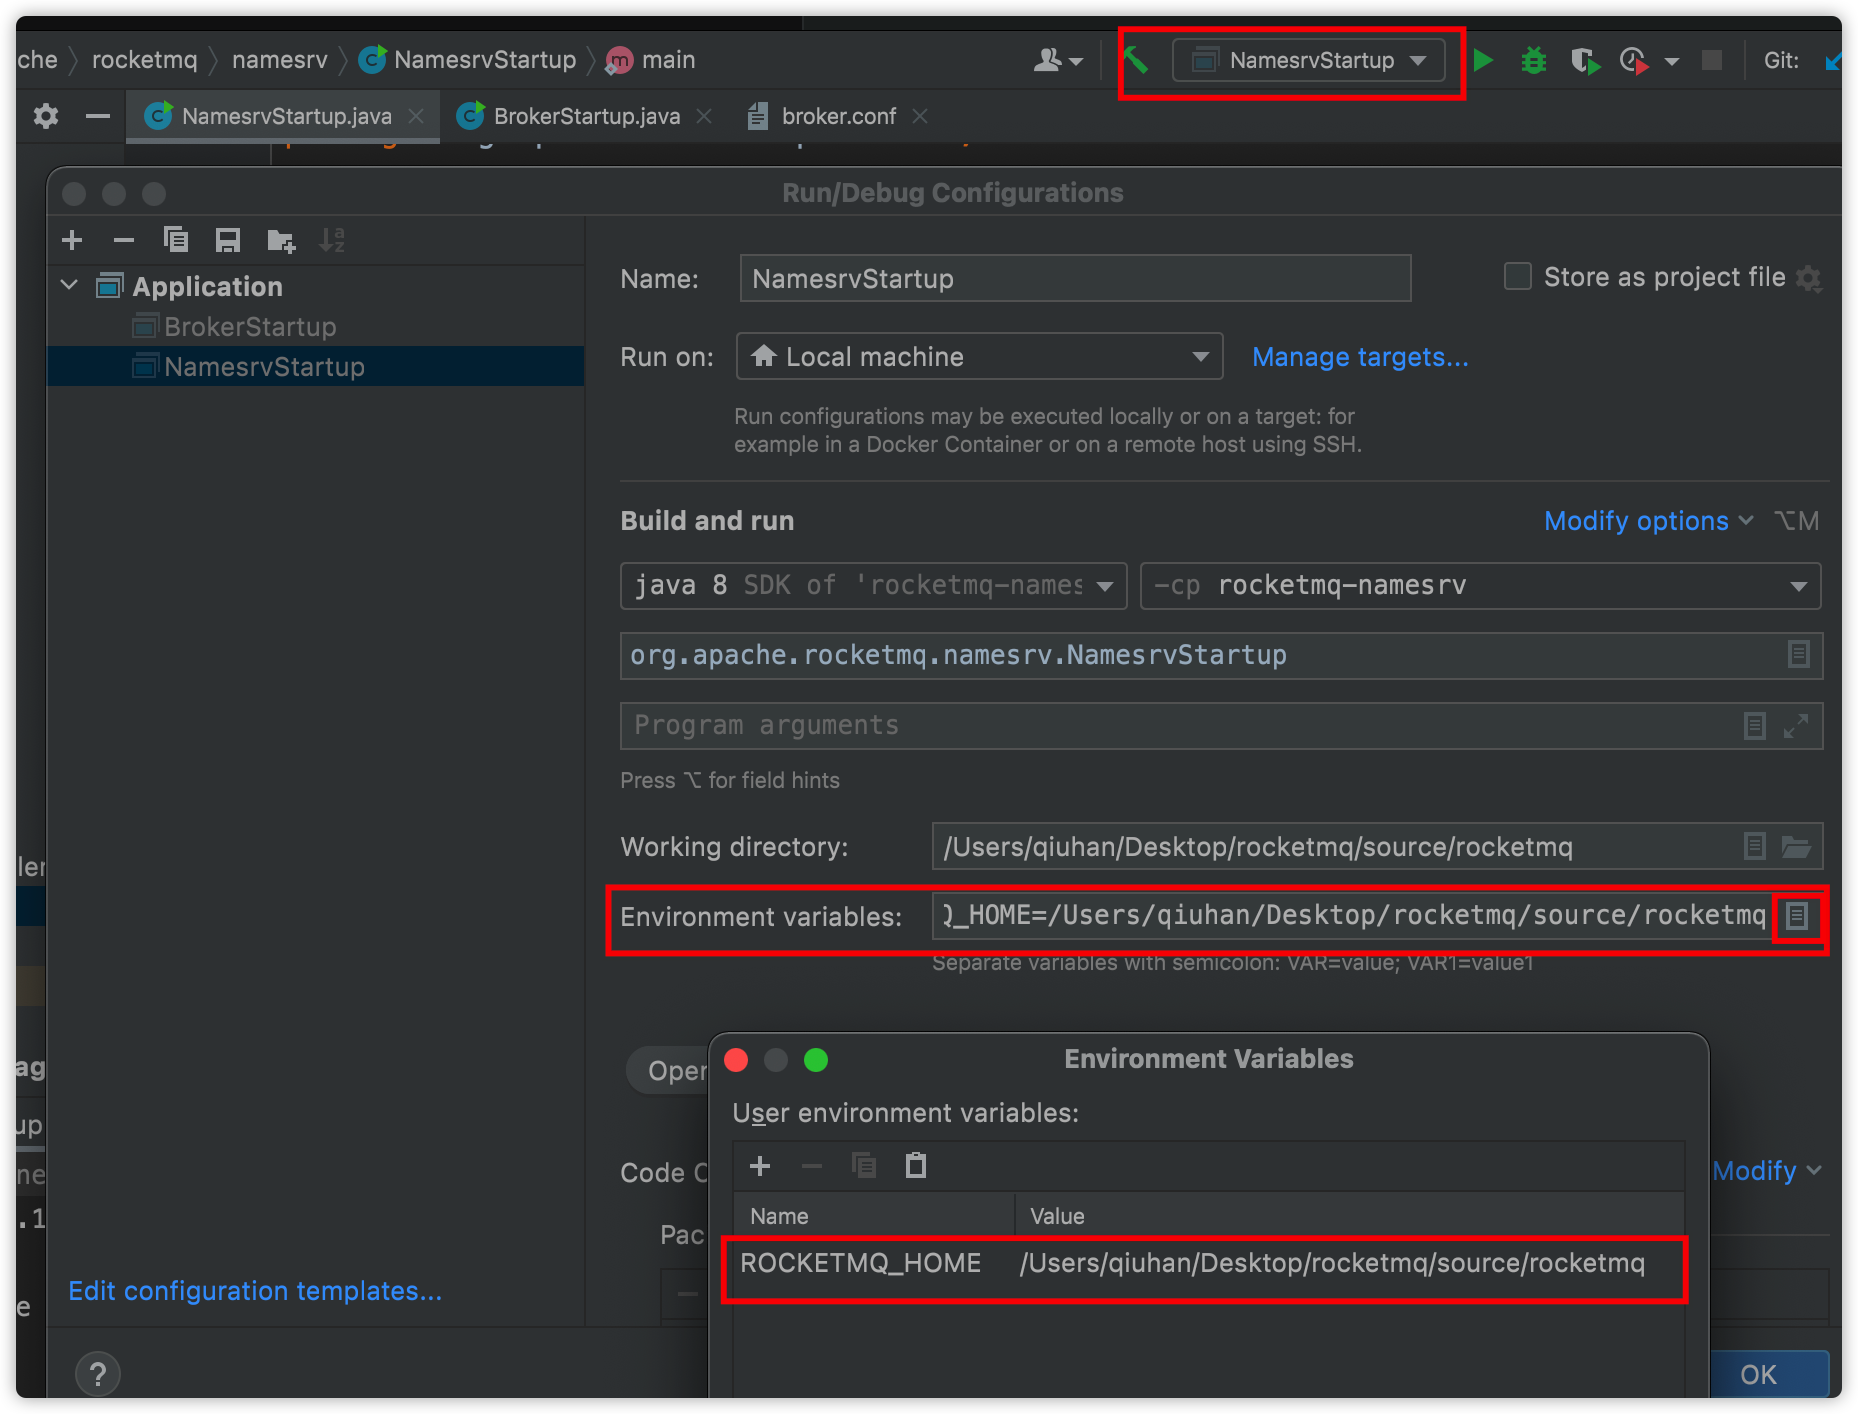
控制台打印
The Name Server boot success. serializeType=JSON即启动成功启动 broker
org.apache.rocketmq.broker.BrokerStartup#main在上述基础上添加
Program arhuments用于指定使用的broker.conf配置文件-c /Users/qiuhan/Desktop/rocketmq/source/rocketmq/conf/broker.conf查看
/Users/qiuhan/logs/rocketmqlogs/broker.log日志文件是否启动成功使用源码中案例进行调试
.../rocketmq/example/src/main/java/org/apache/rocketmq/example/quickstart
基础概念
名字服务(Name Server)
名称服务充当路由消息的提供者。生产者或消费者能够通过名字服务查找各主题相应的Broker IP列表。多个Namesrv实例组成集群,但相互独立,没有信息交换。
消息模型(Message Model)
RocketMQ主要由 Producer、Broker、Consumer 三部分组成,其中Producer 负责生产消息,Consumer 负责消费消息,Broker 负责存储消息。Broker 在实际部署过程中对应一台服务器,每个 Broker 可以存储多个Topic的消息,每个Topic的消息也可以分片存储于不同的 Broker。Message Queue 用于存储消息的物理地址,每个Topic中的消息地址存储于多个 Message Queue 中。
消息生产者(Producer)
负责生产消息,一般由业务系统负责生产消息。一个消息生产者会把业务应用系统里产生的消息发送到broker服务器。RocketMQ提供多种发送方式,同步发送、异步发送、顺序发送、单向发送。同步和异步方式均需要Broker返回确认信息,单向发送不需要。
消息消费者(Consumer)
负责消费消息,一般是后台系统负责异步消费。一个消息消费者会从Broker服务器拉取消息、并将其提供给应用程序。从用户应用的角度而言提供了两种消费形式:拉取式消费、推动式消费。
主题(Topic)
表示一类消息的集合,每个主题包含若干条消息,每条消息只能属于一个主题,是RocketMQ进行消息订阅的基本单位。
代理服务器(Broker Server)
消息中转角色,负责存储消息、转发消息。代理服务器在RocketMQ系统中负责接收从生产者发送来的消息并存储、同时为消费者的拉取请求作准备。代理服务器也存储消息相关的元数据,包括消费者组、消费进度偏移和主题和队列消息等。